WPC Installation Guide
What should install a WPC DECKING FLOOR to notice?
Like everything else about WPC composite boards, installation is easy. First, the infrastructure must be in place to ensure adequate drainage below the deck. The subframe shall be laid at a slight gradient of 1-1.5% from the wall and shall be laid lengthwise. Be sure to set the subframe from any surrounding walls or barriers to allow slight extension.
In general, the span of joists should not exceed 35cm when the wood-plastic floor is fixed, and at least three joists are required for each board.
Joist span is determined by plate thickness. If a hollow floor is installed, factors such as wall thickness and plate thickness should be considered, which directly affect the span of joists.
Note:
- Joist span should be shorter under special conditions and overload.
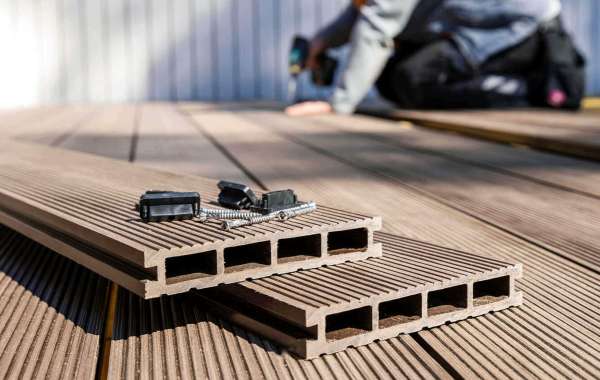
- stainless steel tapping screws are the first choice for installation; Screw length is adjusted with plate thickness. Under normal circumstances, the depth of the screw fixed in the keel is 20mm as the calculation of the screw length, do not screw too tight.
- Clamps and screws will be provided to the customer together with the floor, when using our clamps and screws for installation, installation is easier and better. The clamp will keep space between 2 plates, do not compress the clamp to reduce space.

Procedure for installing WPC DECKING FLOOR:
- Drill holes on the concrete floor and insert expansion screws into the holes, and do not expose them.
- It is necessary to leave space between the joist interface and the wall head. Joists should be placed across to avoid the joist interface being on the same line.
- Secure the keel with stainless steel screws, ensuring that the screw head should be lower than the surface of the keel without obvious concave and convex.
- Screw the first and last wood-plastic panels, either from the side with screws, or with side clamps. Please select according to your actual requirements.
- Drill holes before fixing the screws. The diameter of the holes should not exceed 3/4 of the diameter of the screws.
- After securing the first board, install it one by one with clamps.
- Please use a ruler to calculate the width of the last board to leave room for correct cutting.
- Please place the cut boards one by one, push the clamps from the upper board, and push the second board from the upper board. When the clamps are placed, please do not directly fix them.
- Screw holes to secure the last plank, keeping distance between deck and side plank.
- After securing the last plate, secure the prepared clip with screws.


